In the Desktop Automation Series, you can find invaluable tips and tricks about desktop automation. I will dedicate the next couple of articles on the automation of desktop apps. For the job we will leverage on a new piece of technology called WinAppDriver, developed and maintained by Microsoft. The framework utilizes the WebDriver Wire Protocol and uses the same client-server architecture as Selenium WebDriver. This will be the first article from the series helping you to get started.
Installing and Running Windows Application Driver
1. Download WinAppDriver
2. Install WinAppDriver
3. Enable Windows 10 Developer Mode
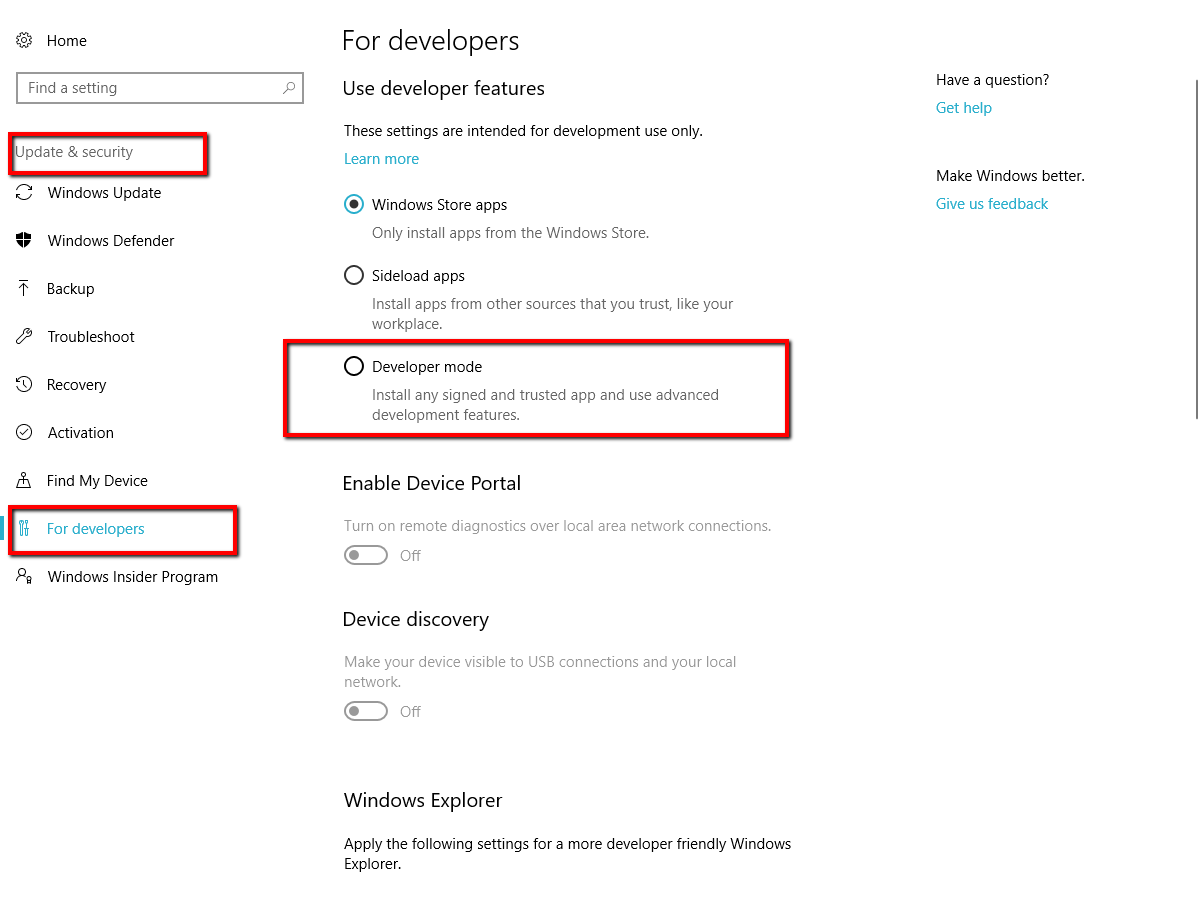
Open Windows 10 Settings. Then navigate to Update & Settings section. Click For Developers tab. Choose the Developer mode option.
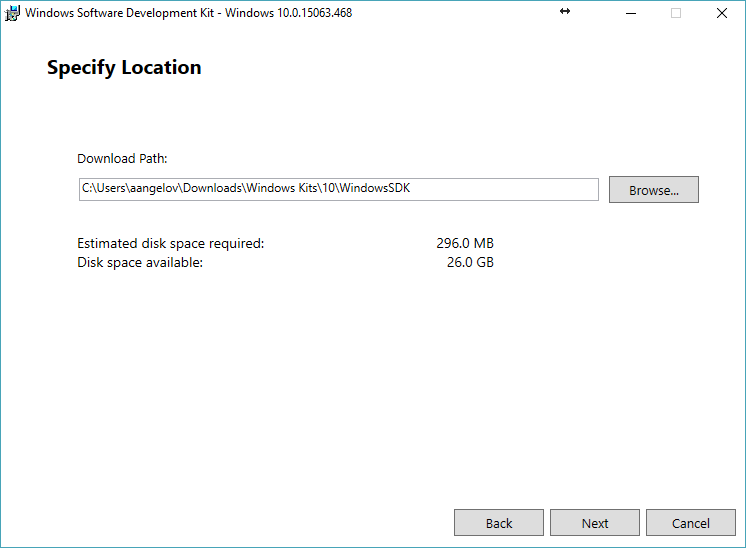
4. Download Windows SDK
5. Install Windows SDK
6. Create a new test project in Visual Studio
7. Install the required NuGet packages
<PackageReference Include="Microsoft.WinAppDriver.Appium.WebDriver" Version="*" />
<PackageReference Include="Microsoft.CSharp" Version="*" />
<PackageReference Include="Newtonsoft.Json" Version="*" />
<PackageReference Include="Selenium.Support" Version="*" />
<PackageReference Include="Selenium.WebDriver" Version="*" />
<PackageReference Include="DotNetSeleniumExtras.PageObjects.Core" Version="*" />
<PackageReference Include="DotNetSeleniumExtras.WaitHelpers" Version="*" />
<PackageReference Include="Microsoft.NET.Test.Sdk" Version="*" />
<PackageReference Include="NUnit" Version="*" />
<PackageReference Include="NUnit3TestAdapter" Version="*">
<PrivateAssets>all</PrivateAssets>
<IncludeAssets>runtime; build; native; contentfiles; analyzers; buildtransitive</IncludeAssets>
</PackageReference>
Since WinAppDriver is built on top of the Appium framework the most important NuGet package that you need to install is Microsoft.WinAppDriver.Appium.WebDriver. You can use some other unit test framework if you don’t like NUnit. For all packages I use the Version=”*” option which will install the latest stable version of the package. Since the package is still not-stable and in BETA you can use Appium.WebDriver instead.
Using Appium
Windows Application Driver is integrated with Appium, meaning if you use Appium as part of the test runner then it will launch WinAppDriver.exe and proxy the requests for you.
Initialize Windows Application Driver
Before you can run your tests you need to start the WinAppDriver server. By default you can find it here: C:\Program Files (x86)\Windows Application Driver\WinAppDriver.exe
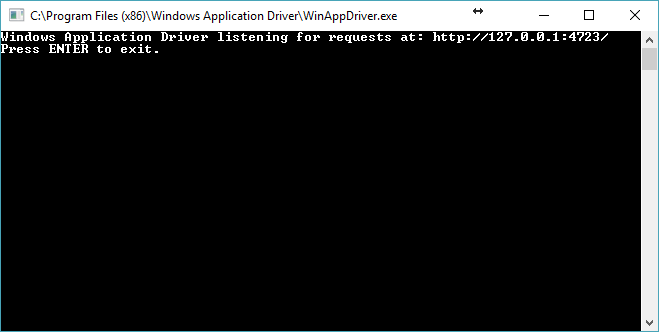
Once opened it starts listening on port 4723. In your tests, you connect to this URL.
This is how we create a new instance of the Windows Application Driver.
var options = new AppiumOptions();
options.AdditionalCapability("app", "Microsoft.WindowsCalculator_8wekyb3d8bbwe!App");
options.AdditionalCapability("deviceName", "WindowsPC");
_driver = new WindowsDriver<WindowsElement>(new Uri("http://127.0.0.1:4723"), options);
_driver.Manage().Timeouts().ImplicitWait = TimeSpan.FromSeconds(5);
For the app option, you need to set the appId for the desktop application that you want to automate. For the deviceName option, you need always to set WindowsPC. In future you will be able to automate other MS devices such as XBox then you will set something else. The constructor of WindowsDriver accepts a Uri pointing the URL of the server that we already started.
While ago when we were working on the first version of the BELLATRIX test automation framework, I did this research while I was working on the desktop testing module of the solution.
Find Application AppId
It is a little bit tricky to find the appId of your applications.
In short, you can use the below PowerShell code to locate the appId of all installed apps.
function listAumids( $userAccount )
{
    if ($userAccount - eq "allusers")
{
# Find installed packages for all accounts. Must be run as an administrator in order to use this option.
$installedapps = Get - AppxPackage - allusers
}
elseif($userAccount)
{
# Find installed packages for the specified account. Must be run as an administrator in order to use this option.
$installedapps = get - AppxPackage - user $userAccount
}
else
{
# Find installed packages for the current account.
$installedapps = get - AppxPackage
}
$aumidList = @()
foreach ($app in $installedapps)
{
    foreach ($id in (Get - AppxPackageManifest $app).package.applications.application.id)
{
$aumidList += $app.packagefamilyname + "!" + $id
}
}
return $aumidList
}
Call listAumids(“allusers”) to find the appId of all installed apps for all users of the current machine.
Locating Elements
The latest Visual Studio version by default includes the Windows SDK with a great tool to inspect the application you are testing. This tool allows you to see every UI element/node that you can query using Windows Application Driver. This inspect.exe tool can be found under the Windows SDK folder which is typically C:\Program Files (x86)\Windows Kits\10\bin\
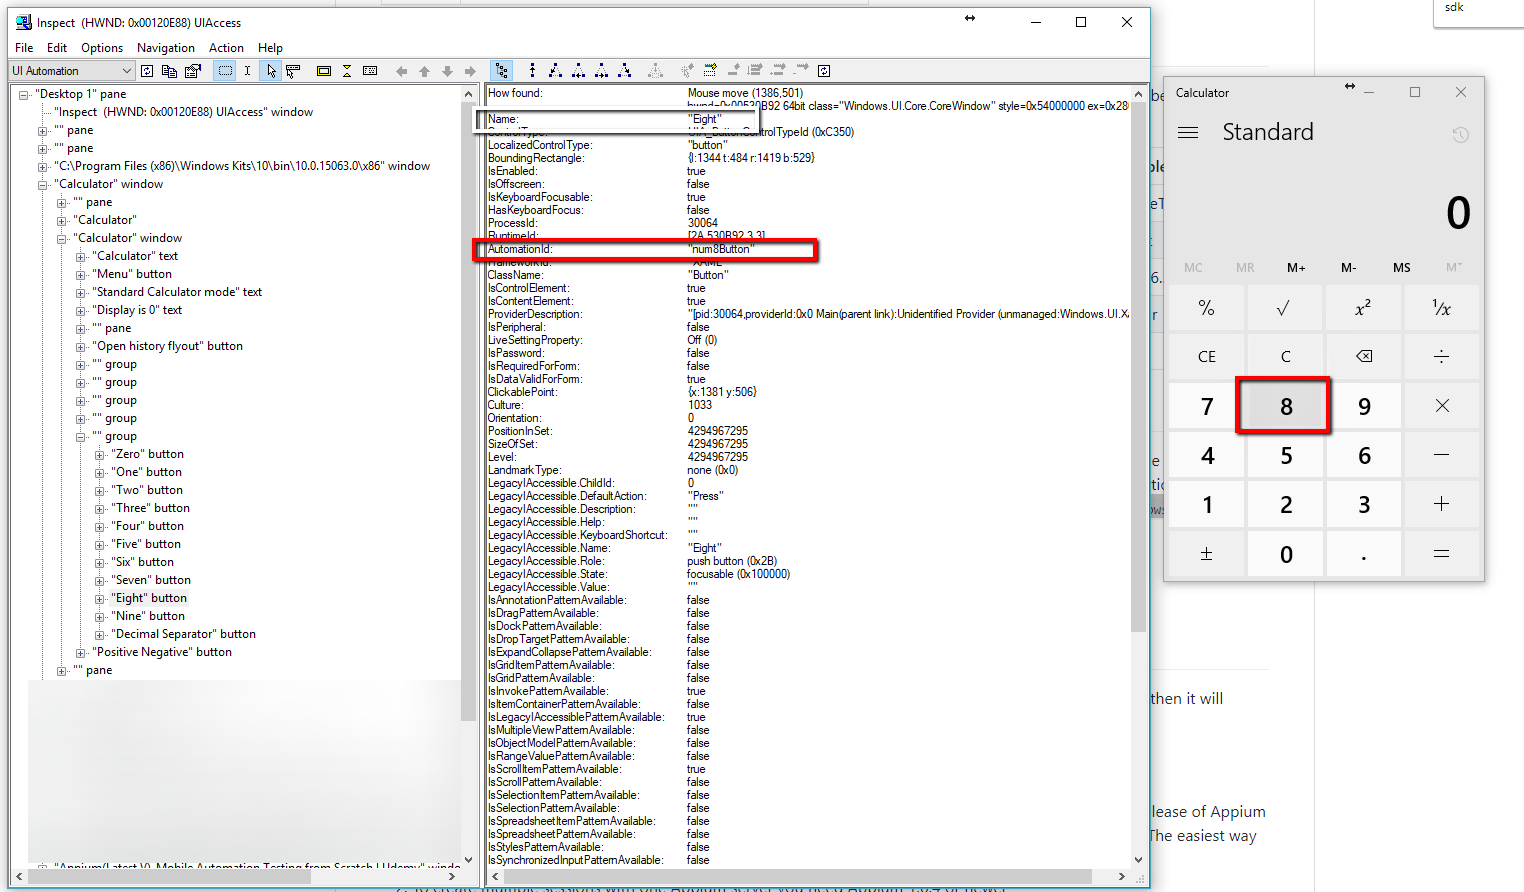
Once started, each time you point some element, you can find a detailed information which you can later use to locate it in WebDriver.
The locators supported by WinAppDriver are similar to the ones in Selenium WebDriver.
| Client API | Locator Strategy | Matched Attribute in inspect.exe | Example |
|---|---|---|---|
FindElementByAccessibilityId | accessibility id | AutomationId | AppNameTitle |
FindElementByClassName | class name | ClassName | TextBlock |
FindElementById | id | RuntimeId (decimal) | 42.333896.3.1 |
FindElementByName | name | Name | Calculator |
FindElementByTagName | tag name | LocalizedControlType (upper camel case) | Text |
Tests Examples C# Code
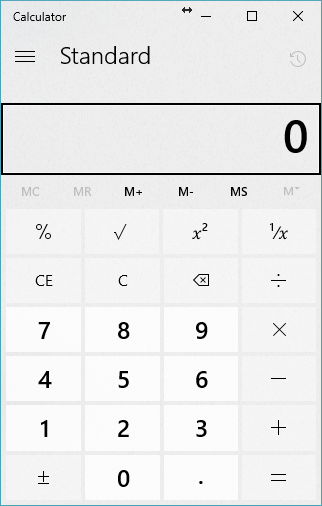
Bellow, you can find a simple NUnit test for testing the default Windows 10 Calculator. We add 5 to 7 and expect 12 to be the result.
public void Addition()
{
    _driver.FindElementByName("Five").Click();
    _driver.FindElementByName("Plus").Click();
    _driver.FindElementByName("Seven").Click();
    _driver.FindElementByName("Equals").Click();
    var calculatorResult = GetCalculatorResultText();
    Assert.AreEqual("12", calculatorResult);
}
private string GetCalculatorResultText()
{
    return _driver.FindElementByAccessibilityId("CalculatorResults").Text.Replace("Display is", string.Empty).Trim();
}
We locate the buttons by name through the help of inspect.exe. We need to modify a little bit the result to simplify the code of the rest of the tests.
Below you can find a couple of more tests where we execute various calculator operations. In each test, we use different locator strategies so that you can see all of them in action. The last test shows how you can use data driven testing in desktop apps’ automation.
public class CalculatorTests
{
    private WindowsDriver<WindowsElement> _driver;

    public void TestInit()
    {
        var options = new AppiumOptions();
        options.AddAdditionalCapability("app", "Microsoft.WindowsCalculator_8wekyb3d8bbwe!App");
        options.AddAdditionalCapability("deviceName", "WindowsPC");
        _driver = new WindowsDriver<WindowsElement>(new Uri("http://127.0.0.1:4723"), options);
        _driver.Manage().Timeouts().ImplicitWait = TimeSpan.FromSeconds(5);
    }

    public void TestCleanup()
    {
        if (_driver != null)
        {
            _driver.Quit();
            _driver = null;
        }
    }

    public void Addition()
    {
        _driver.FindElementByName("Five").Click();
        _driver.FindElementByName("Plus").Click();
        _driver.FindElementByName("Seven").Click();
        _driver.FindElementByName("Equals").Click();
        var calculatorResult = GetCalculatorResultText();
        Assert.AreEqual("12", calculatorResult);
    }

    public void Division()
    {
        _driver.FindElementByAccessibilityId("num8Button").Click();
        _driver.FindElementByAccessibilityId("num8Button").Click();
        _driver.FindElementByAccessibilityId("divideButton").Click();
        _driver.FindElementByAccessibilityId("num1Button").Click();
        _driver.FindElementByAccessibilityId("num1Button").Click();
        _driver.FindElementByAccessibilityId("equalButton").Click();
        Assert.AreEqual("8", GetCalculatorResultText());
    }

    public void Multiplication()
    {
        _driver.FindElementByXPath("//Button[@Name='Nine']").Click();
        _driver.FindElementByXPath("//Button[@Name='Multiply by']").Click();
        _driver.FindElementByXPath("//Button[@Name='Nine']").Click();
        _driver.FindElementByXPath("//Button[@Name='Equals']").Click();
        Assert.AreEqual("81", GetCalculatorResultText());
    }

    public void Subtraction()
    {
        _driver.FindElementByXPath("//Button[@AutomationId="num9Button"]").Click();
        _driver.FindElementByXPath("//Button[@AutomationId="minusButton"]").Click();
        _driver.FindElementByXPath("//Button[@AutomationId="num1Button"]").Click();
        _driver.FindElementByXPath("//Button[@AutomationId="equalButton"]").Click();
        Assert.AreEqual("8", GetCalculatorResultText());
    }

    [TestCase("One", "Plus", "Seven", "8")]
    [TestCase("Nine", "Minus", "One", "8")]
    [TestCase("Eight", "Divide by", "Eight", "1")]
    public void Templatized(string input1, string operation, string input2, string expectedResult)
    {
        _driver.FindElementByName(input1).Click();
        _driver.FindElementByName(operation).Click();
        _driver.FindElementByName(input2).Click();
        _driver.FindElementByName("Equals").Click();
        Assert.AreEqual(expectedResult, GetCalculatorResultText());
    }
    private string GetCalculatorResultText()
    {
        return _driver.FindElementByAccessibilityId("CalculatorResults").Text.Replace("Display is", string.Empty).Trim();
    }
In the above code we open and close the app for each test, which is a slow operation. You can always reuse the app by initializing the driver in class initialize method.
Do not forget to dispose the app driver at the end of your tests. Also, always make sure to close the WinAppServer.exe after the tests’ execution.
In the next articles from the series, I will show you how to utilize the Page Object Design Pattern.